Adobe Express has a plethora of graphic, video, presentation, and PDF editing tools that make it easy to quickly create professional-quality outreach materials. Grab a flyer template to promote your next fundraiser, edit together clips of volunteers serving your community, or create a visually stunning annual report for your organization.
We could easily go into all the great features within Adobe Express Premium, from its extensive templates, fonts, and stock photos, or the generative AI capabilities, but that’s not very fun, is it? We’d much rather show you a few useful tips to get you started with this versatile app.
How to Resize a Photo in Adobe Express
When we say Adobe Express makes creating quicker than ever before, one of the ways it’s possible is with quick actions. If you just need to resize an image, cut or merge some video clips together, or make a collage, you can do it in just a few minutes.

Quick actions in Adobe Express.
To get to the image resize features, go to Adobe Express and select Explore quick actions. From there, do the following.
- Select Resize image.

- Select the social media platform you need dimensions for, or use custom dimensions.
- Choose the ratio you need and use the Zoom and Crop slider to resize as desired. Once you're done, you can download the cropped image or open it in the Adobe Express image editor.

The Resize Image panel in Adobe Express.
How to Remove an Object in a Photo in Adobe Express
Adobe Express makes it easy to remove unwanted objects from your photos — no advanced photo editing skills required.
- While in the editor, select the image you want to edit then select Remove object from the sidebar along the left-hand side of the window.
- Use the brush tool to draw over the area of the photo you would like to remove. In this example, I painted over the puppy on the right.

- Press the Remove button.
- Adobe Express will offer up a few different versions of the edited image. Choose the result you like best and then press the Keep button.

How to Design a Flyer with Templates
If you need a flyer, social media post, or invitation, the sky really is the limit because Adobe Express has literally thousands of templates to choose from. You can search the vast library by keyword, and if you’ve requested Adobe Express Premium through TechSoup, you’ll have access to unlimited premium templates.

- Choose a template from the thousands available. You can do so from within the editor by selecting Templates from the sidebar along the left. You can also access templates by selecting Browsing templates from the Home screen. You can search by keyword, such as “fundraiser” or “charity drive.”
- Choose the template you’d like to use and start editing.
- If you want to change the photo, you can import one from your computer or mobile device. Or, you can use a photo from Adobe Express's included library of royalty-free stock images. In this example, I'm using one of a person with a dog.
- Remove the background of this photo by selecting it and choosing Remove background in the left toolbar.
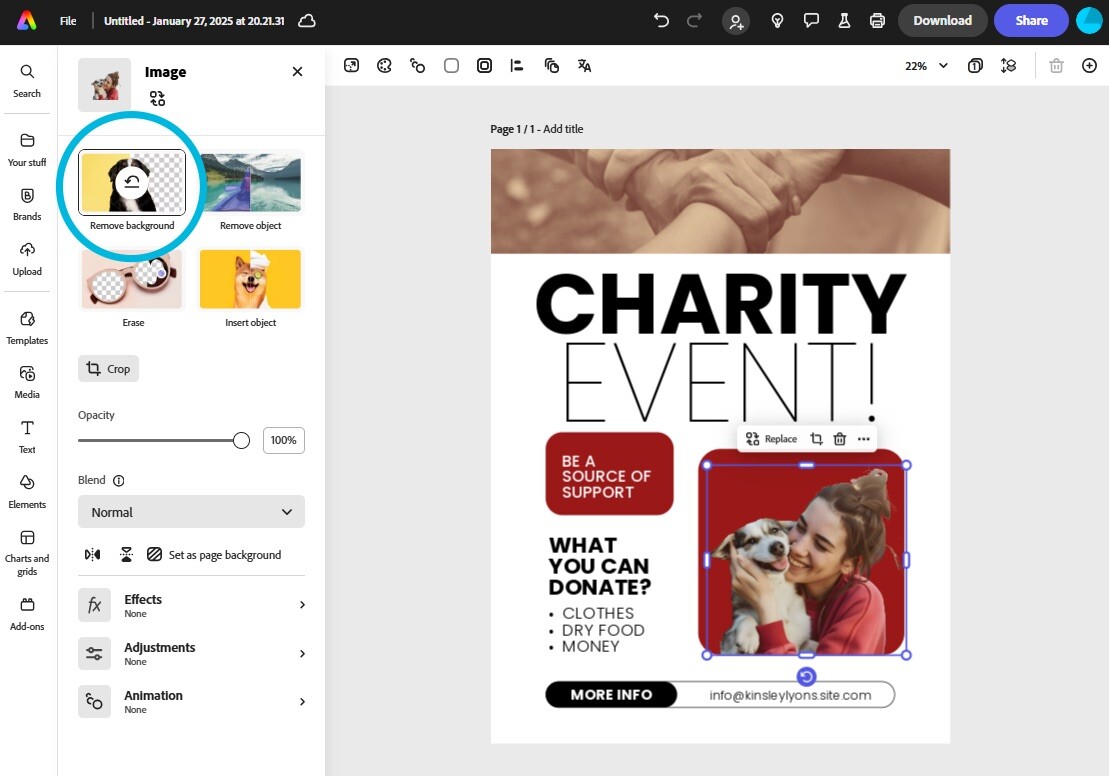
Background, begone! I removed the background from a photo of a person and a dog and placed it inside a red square. The photo is one of a selection of royalty-free Adobe Stock photos included with an Adobe Express Premium membership.
- You can edit text by selecting each text box. You can change the font, text size, text color, orientation, and so on. You’ll even find text effects.
- Once your flyer is complete, you can download, share, or print it. To download, select Download from the upper right corner of the window. You can download as PNG, JPG, PDF Standard, or PDF Print file formats.
Once you have selected your file format — and have chosen whether to download all pages in your document or just the selected page — press the Download button in the panel that appears.

Download options in Adobe Express.
You can also share your design with a colleague, upload it to an online document storage service, or schedule a post for social media. To access these features, select Share from the toolbar, select the sharing method of your choice, and then follow the onscreen instructions.
There is also the option to print your creation with Zazzle, for example, if you are designing merchandise.
The Sharing panel in Adobe Express.
How to Translate a Document in Adobe Express
If you often need to translate your projects into one or more languages, allow Adobe Express to be your assistant. Choose from over 40 languages and translate multiple at a time. It's a good idea to review the translation afterward, but it sure saves a lot of time and resources.
- While in the image editor, go to the document’s top toolbar and choose Translate.
- Select all the languages you need to translate your content into.

Translation options in Adobe Express.
- Choose the tone of voice to use in the translation.
- Choose which pages to translate. You can have Adobe Express translate all pages or only those you select.
- Press the Translate button. Adobe Express will get to work and translate your document.
How to Import Adobe Photoshop or Illustrator Files into Adobe Express
A benefit of using Adobe Express is that you can import and edit other documents in Adobe Photoshop or Illustrator formats. This is particularly helpful if you have something designed in another Adobe Creative Cloud app and want it to be easily editable by others in Adobe Express.
- To begin, go to the Home screen in Adobe Express. In the top menu options, choose Start from your content.

- Find the Illustrator or Photoshop file that you’d like to import from your computer. There are some restrictions for size and languages: For example, Illustrator files must be under 100 MB. Canvas sizes must be least 50 pixels wide by 50 pixels tall and measure no more than 8,000 pixels by 8,000 pixels.
- For this example, I created a three-layer graphic in Illustrator. You can choose to place the file as a linked image, so you can continue to make edits to the image in Photoshop or Illustrator and it will sync with Adobe Express, and vice versa. Or you can convert the file to an Adobe Express file, but no changes will be made to the Photoshop or Illustrator file.

Selecting an Adobe Illustrator document to import into Adobe Express.
- Once imported, Adobe Express maintains the layers so you can shift things around as needed, add text, and so on.
Discover What's Possible
We’ve only scratched the surface of what is possible with Adobe Express. Designing graphics and editing video is now more approachable than ever, so that anyone, no matter their skill level, can easily create something.
Nonprofits can request up to 50 Adobe Express Premium memberships per year at no cost through TechSoup.

New to TechSoup? Learn how to get this offer.