This blog post is more than five years old. It may contain outdated information or refer to products that are no longer available.
Since launching in 2015, Facebook Live has exploded in popularity. And now that you can use video conferencing software providers such as Zoom to broadcast live to Facebook, there are even more ways to reach your community.
Today, Facebook Live videos get six times more interactions than regular Facebook videos, with Facebook Live now comprising 20 percent of all video content on the platform. And since Facebook's new algorithm will now rank these types of posts higher in the News Feed, those stats will only continue to rise.
Facebook Live is a great way for your nonprofit to directly engage with your followers and share your mission with new ones. Plus, it's surprisingly easy to use. After reading this post, you'll be able to broadcast a Facebook Live event of your own.
Note: This post was originally published in February 2019. It was updated in May 2020 with the latest information.
1. Gather Your Equipment
One of the best things about using Facebook Live is that it doesn't require any fancy equipment to get started. All you really need is one of the following:
- Smartphone or tablet
- Desktop computer and a basic webcam
- Built-in laptop camera
If possible, use a tripod for a steadier, more professional shot.
A basic lighting setup can also improve the look and quality of your video, but it isn't necessary. Here's a guide to building one for under $100. Otherwise, just be mindful of how your subject is lit and make sure they aren't lost in any shadows.
The same goes for recording equipment. A trip to an electronics store or a brief web search will yield dozens of affordable options, so if you have the resources and know-how, then by all means go for it.
But again, you don't need expensive gear to broadcast a Facebook Live video. We'll be focusing on how to do it using materials you likely already have or can afford, even if you're on a tight budget.
2. Test Your Wi-Fi Connection
You also need a strong Wi-Fi connection to live-stream. You don't want your video cutting in and out as the action happens, so test your connection beforehand. Hotspots, such as those offered through Mobile Beacon, can also help boost your signal. If you are away from Wi-Fi, you can still broadcast on Facebook Live — just be sure that your mobile device has access to a 4G network.

3. Consider Third-Party Streaming Tools
Though producing live-streams natively on Facebook is the easiest and the cheapest option, more people are using paid third-party tools for added features such as screen sharing, having multiple presenters on at the same time, and adding custom titles and graphics.
Zoom, for instance, has the ability to stream your webinar or meeting live on Facebook to your personal timeline, a group, or a page that you are an admin for. This allows your community to join via Zoom or as viewers to watch and comment on Facebook Live. (See this example from a TechSoup Talk using Zoom for a Facebook Live broadcast.)
There are also live-streaming studios, like StreamYard or Be.Live, to further customize your broadcast with your own graphics with the ability to go live on multiple social media platforms at once.
4. Plan Your Broadcast
Just as you plan before writing a blog post or an email newsletter, the same goes for a Facebook Live stream. Start by taking some time to think about why you'd like to do a Facebook Live as opposed to another format of content. Consider the real-time interactivity and engagement features of a live-stream, such as polling and Q&A, and how you would use them.
Also think about how often you’d like to broadcast. Would you like to make it a weekly series? Or will it be more ad hoc?
You also have the option to go live now or schedule a live video. Scheduling a broadcast is great for building anticipation and making your audience tune in at the right time. You can schedule a Facebook Live video up to one week in advance. As soon as you schedule your live broadcast, an announcement post is published to your page letting your followers know that there's an upcoming broadcast so they can get a reminder before the broadcast begins.
With scheduled broadcasts, you also have time to publish a test broadcast from within the Facebook Live Producer page. This is a great opportunity to do a practice run with your team and any guests to make sure you get the shot and flow you’re aiming for. See step 6, Get Ready to Broadcast, for more information on how to set up a test broadcast.
Once you have your purpose and cadence established, start planning what you want to say or do in your live-stream. A simple intro and outro script can ensure that you introduce yourself, your guests, and the topic as intended for your live-stream. Having a list of talking points and questions at the ready can help ensure a smooth flow and can come in handy whether you're doing a Q&A with a volunteer, showing behind the scenes of your team's work, or streaming a live performance.
5. Set Up the Shot
Preparing for your live event will vary depending on the nature of your broadcast, but it's good to keep a few things in mind.
- Be mindful of both noise and lighting wherever you shoot. Try to have as controlled an environment as possible. If you are using a real-deal lighting setup, take a look at this video on the basics of three-point lighting.
- If you can, use a tripod. The advantage of using a webcam or laptop is that they can easily be kept steady using some kind of flat surface.
- If you are shooting a lecture or an interview, restrict people from entering the area in which it's taking place.
- If you are shooting something like the Best Friends Animal Society, be aware of your surroundings and be prepared to act quickly if something unplanned occurs.
6. Get Ready to Broadcast
After completing these steps, you are just about ready to go live.
If you're using a third-party software provider such as Zoom for your Facebook Live broadcast, follow this guide for step-by-step instructions and to make sure you have the right license, account settings, and Facebook permissions.
If you're streaming directly from Facebook, decide whether to use a phone or camera.
If you’re streaming from your phone:
- Navigate to your page, profile, group, or event.
- Select Live from the composer.
- Add a description to your post. Here you can also tag friends, check in to a location, add a feeling, or add a Donate button to raise money for a nonprofit or charitable organization, including your own.
- Tap Start Live Video.
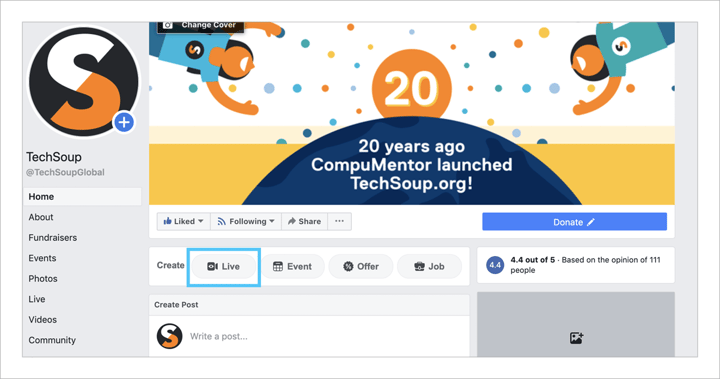
If you're streaming from a desktop or laptop computer:
- Navigate to your page and select Create Live at the top above where you post updates. Or you can get started by heading over to Facebook's Live Producer at facebook.com/live/producer.
- Select Go Live Now or Schedule a Live Video for a future time and date.
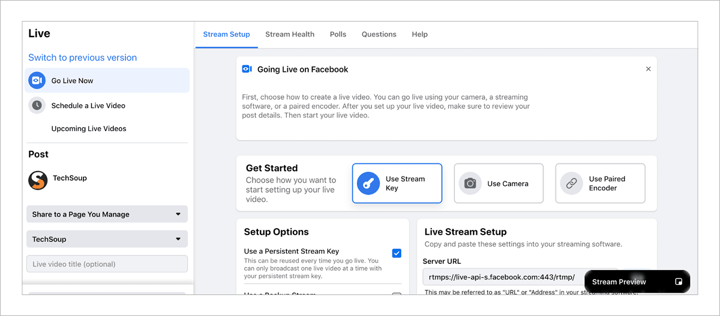
- Select Share to a Page You Manage from the first dropdown menu. Choose the page you would like to stream to from the second dropdown menu.
- Add a title and description to your post. Here you can also tag friends, check in to a location, add a donate button, or add a feeling.
- At the bottom, you'll see an option to publish as a test broadcast. Think of this as your dress rehearsal. You can test updated production workflows and interactive features and show formats without having to go live in front of your entire audience.
7. Go Live!
It's the time that you and your followers have been waiting for. Here are a few tips and best practices to keep in mind once you're live.
- Give people a minute or so to join your Live video before getting started.
- Make sure to say hello to people who are joining and start with an icebreaker such as asking people where they are joining in from or what they are hoping to learn about.
- Pin great comments to the top of the chat.
- Bring audience questions or comments into the broadcast itself by answering questions on-air.
- Indicate that you are wrapping things up with a line such as, "Thanks for watching!"
- Click Finish when you want to end your broadcast.
Use this guide to create a Facebook Live event at your nonprofit today. Your followers will thank you!

Additional Resources: Social Media for Nonprofits
- Take courses in What Facebook Ads Can Do For Your Organization.
- Explore TechSoup's Digital Marketing Services.
- Read everything you need to know about Social Media for Nonprofits.
- Explore How Facebook Analytics and Insights Can Help Your Nonprofit.
- Find out What Your Nonprofit Needs to Know About Facebook's New Algorithm.
- See The Top 10 Nonprofit Instagram Accounts: What to Learn from Them.